Diode Checkout Procedure
Product Support and Customer Service
For Further support visit our Contact Page
Safety
Think and act in a safe manner. Always disconnect power and use a lockout before you work on the E-coat system, or any of the related subsystems. Observe any confined space conditions. Use the appropriate safety equipment and clothing for the task. Please carefully read all the instructions listed below to familiarize yourself with the project before attempting to perform any of the work.
Required Materials
- Flashlight
Required Tools
- Digital VOM
General
Diodes are used in electrical circuits to restrict the ‘backflow’ of current. In this mode, they are much like check valves that do not allow fluid to flow backwards. The diode performs its job, but does consume approximately 0.7 volt or less. This voltage drop across the diode is referred to as the forward voltage or Vf. A diode will generate heat as it operates. As an example, if the current flow is 10 amps, the dissipated heat is approximately: I x Vf or 20 amps x 0.7 volts = 14 VA = 14 watts. Thus, the diode needs an appropriate heat sink. Diodes can fail to operate or function. In some cases, the diode will fail in the ‘closed’ position, which will allow the back flow of current. If the diode fails in the ‘open’ position, then no current can flow.
Generally it is not necessary to remove the diode from its place in order to check or visually inspect it. You must follow your company’s lockout and tagout procedures and turn off the DC rectifier.
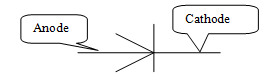
- Use a VOM with the diode continuity check option. Place red test lead on the anode side of the diode (look for the diagram printed on the diode to help select the anode) and the black test lead on the cathode side of the diode. The VOM should display 0.7 volts or less.
- Reverse the leads; if the meter reads OL, then the diode is OK.
- However, If the diode has failed in the closed, or shorted position, then 0+ volts is displayed now.
- If the diode has failed in the open position, then the meter will display OL in Step #1 and Step #2.
- Visually inspect the diode for dark scorch marks, heat stress, etc.
- Visually inspect the bolted connections of the diode and ensure a compression washer is used.
- Make sure the heat sink is clean from dust, paint, grease and dirt. Clean if needed.
BULLETIN 990402