Bare Electrode Holders
Product Support and Customer Service
For Further support visit our Contact Page
Safety
Think and act in a safe manner. Always disconnect power and use a lockout before you work on the E-coat system, or any of the related subsystems. Observe any confined space conditions. Use the appropriate safety equipment and clothing for the task. Please carefully read all the instructions listed below to familiarize yourself with the project before attempting to perform any of the work.
Required Materials
- Primer
- Heavy Bonded Cement
Required Tools
- Screwdriver
- ¾” Wrench
- 2 ½” Wrenches
- Torque Wrench
Step 1
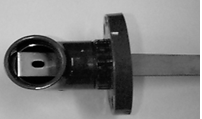
Insert the Electrode Tab into the elbow. Insert a screwdriver or some type of hook into the hole of the Electrode Tab to bend it. This will enable the Electrode Tab to be pulled all the way through the elbow.
Step 2
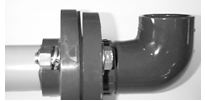
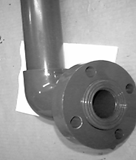
Attach the vanstone/elbow using the hardware provided. The proper sequence for the placement of nuts and bolts is Bolt-Flat Washer-Vanstone-Float Lock-Nut. Torque at 25 pounds.
Step 3
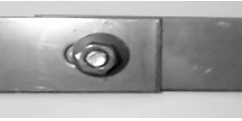
Connect the Tab Extensions at the oval holes with stainless steel nuts and bolts. NOTE: The Tab Extension with two holes at one end should be installed last. The two holes will be used for the electrical connection.
Step 4
Glue the neck to the elbow using primer and heavy bonded cement.
BULLETIN 993135