Replacing and Repairing Quick Connect Housings and Contacts
Contents[Show]
Product Support and Customer Service
For Further support visit our Contact Page
Safety
Think and act in a safe manner. Always disconnect power and use a lockout before you work on the E-coat system, or any of the related subsystems. Observe any confined space conditions. Use the appropriate safety equipment and clothing for the task. Please carefully read all the instructions listed below to familiarize yourself with the project before attempting to perform any of the work.
Required Materials
- Please see the part number matrix for parts to order.
Required Tools
- Wire Cutter
- Standard Screwdriver
- Wire Stripper
- High Capacity Soldering Gun
- Tin Solder and Flux for Electrical Joint
General
Cable Leads have an Electrical Quick Connect for ease of service. Sometimes these are damaged and need to be repaired. If the red plastic housing is broken, begin with Step 3. If the entire quick connect is damaged, begin with Step 1.
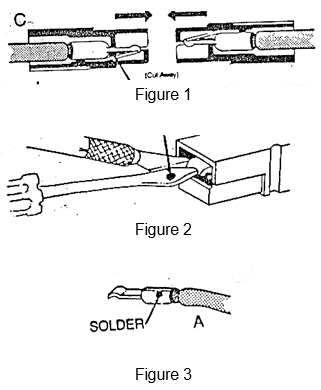
- Remove the damaged housing. Insert a screwdriver between contact and spring. (See Figure 1.) Twist to separate. Push contact of the rear housing with the screwdriver. (See Figure 2.)
- Prepare the cable end. Cut away damaged cable with the wire cutter. Strip the insulation back 9/16”.
- Attach the metal contact. Place the metal contact over the stripped end of the cable and make a solder joint (See Figure 3.)
BULLETIN 990139