1000 Amp Shunt
Product Support and Customer Service
For Further support visit our Contact Page
Safety
Think and act in a safe manner. Always disconnect power and use a lockout before you work on the E-coat system, or any of the related subsystems. Observe any confined space conditions. Use the appropriate safety equipment and clothing for the task. Please carefully read all the instructions listed below to familiarize yourself with the project before attempting to perform any of the work.
Required Materials
- Nema 12 Enclosure
- (4) #8-32 x 1/2”
- Red Plastic Dip
- elden #9341 Cable
Required Tools
- 8-32 Drill & Tap
- 1000 Amp @50m DC Shunt
- Conduit, Fittings etc
General
ADD
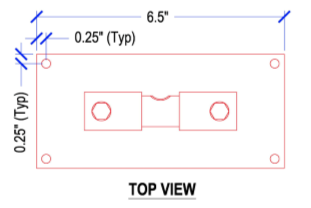
Step 1
Install Shunt inside suitable enclosure with hasp to lcok panel shut. Drill and tap (4) holes for #8-32 threads to secure shunt at corners as shown in “Top View”.
Step 2
Attach a Ring Terminal for the wire with a hole for a 3/8” bolt. Attach this to one side of the shunt. This will be called the “line” side or positive side of the shunt.
Step 3
Repeat step #2 above for the “Load” side for cable that is attached to above the bar. This is the negative side of the shunt.
Step 4
Use a high quality 2 conductive + shield w/PVC jacket such as Belden #9341 for connecting to signal connection point of shunt.
Reference
BULLETIN 99XXXX